Author: mblum6180_l6d6qy
Install OS/2 on a 486DX2 66 Laptop with 8MB RAM and 8GB HDD
Install OS/2 on a 486DX2 66 Laptop with 8MB RAM and 8GB HDD
Required Software:
- Partition Magic 3
- OS/2 3.0 CD-ROM Version
- Ontrack Disk Manager 9.57
- CardSoft 3.1
Installation Steps:
Step 1: Setting Up Ontrack Disk Manager
- Install Ontrack Disk Manager 9.57.
- Use this tool to set up a DOS partition. This step is critical as it prepares your HDD for the drive overlay, which is crucial for the older BIOS to recognize and utilize the full 8GB capacity.
Step 2: Installing CardSoft for PCMCIA Access
- Install CardSoft 3.1.
- This software is necessary for your laptop to access the PCMCIA CF card, which is your medium for transferring OS/2 installation files to the laptop.
Step 3: Hard Drive Partitioning with Partition Magic
- Run Partition Magic 3.
- You need to create a specific partition structure:
- A Boot Manager partition, allowing you to manage multiple operating systems.
- A primary partition dedicated to OS/2.
- An extended DOS partition, which will be used for transferring OS/2 installation files.
Step 4: Transferring OS/2 Files
- Copy all necessary OS/2 installation files to the extended DOS partition.
- These files are generally found in the ‘os2’ directory within the ‘diskimg’ directory on the OS/2 installation CD.
Step 5: Creating OS/2 Installation Disks
- Use the ‘makedsks.bat’ file from the OS/2 CD to create the first two installation disks.
- These disks are essential for booting and initiating the OS/2 installation process.
Step 6: Modifying Config.sys on Installation Disk 1
- Edit the ‘config.sys’ file on the first OS/2 installation disk.
- Modify the line to:
SET OS2SHELL = SYSINIT2 d:\os2. Replaced:\os2with the actual path where you copied the OS/2 installation files.
Step 7: Replacing Critical Files on Installation Disk 1
- Replace
IBM1S506.ADDandOS2DASD.DMDon Disk 1 with the versions from the Ontrack disk. This step is crucial for system compatibility. - Note: Avoid using the
copyfromfloppy=1option, as it has been known to cause system hangs.
- Replace
Step 8: Booting and Installing OS/2
- Boot your laptop using the installation disks.
- Follow the prompts to install OS/2 on the primary partition created earlier. Ensure this partition is set as active in the boot manager.
Step 9: Finalizing Installation
- Once OS/2 is installed, replace
IBM1S506.ADDandOS2DASD.DMDin theC:\os2\bootdirectory on your HDD. This step ensures that the OS boots correctly with your hardware configuration.
- Once OS/2 is installed, replace

Django Deployment on DreamHost
Important Notes Before You Begin
- SQLite on DreamHost: SQLite may not work on DreamHost platforms. It’s recommended to use MySQL as your database backend for production environments.
- MySQL Client Installation: The mysqlclient library, a requirement for connecting Django to a MySQL database, won’t install unless Python is a custom installation. Ensure you follow the steps above to install a custom version of Python.
- Preferred Python Version: Django and Passenger tend to work best with Python 3.10. Make sure to install this version for optimal compatibility.
Setting Up MySQL Database
Follow these steps to set up a MySQL database for your Django project:
- Install MySQL: Ensure that MySQL is installed on your system. On most Linux distributions, you can install it using the package manager.
- Create a Database and User: Log in to MySQL and create a new database and user specifically for your Django project.
mysql -u root -p
CREATE DATABASE mydatabase;
CREATE USER 'mydatabaseuser'@'localhost' IDENTIFIED BY 'mypassword';
GRANT ALL PRIVILEGES ON mydatabase.* TO 'mydatabaseuser'@'localhost';
FLUSH PRIVILEGES;
EXIT;
Download and Extract Python
Begin by downloading the Python package and extracting its contents.
cd ~
mkdir tmp
cd tmp
wget https://www.python.org/ftp/python/3.10.13/Python-3.10.13.tgz
tar zxvf Python-3.10.13.tgz
cd Python-3.10.1
Compile and Install
Configure the Python source code on your system and compile it. This step prepares Python for installation.
./configure --prefix=$HOME/opt/python-3.10.13 --enable-optimizations
make
make install
Update PATH
Ensure your system recognizes the custom Python version by updating the PATH environment variable.
echo "export PATH=$HOME/opt/python-3.10.13/bin:$PATH" >> ~/.bash_profile
Activate Python
Activate the new Python version and confirm the installation.
source ~/.bash_profile
which python3
Install Pip and Virtualenv
Install Pip and Virtualenv to manage packages and environments.
python3 -m pip install --upgrade pip
pip3 install virtualenv
Create a Virtual Environment
Set up a virtual environment for your Python projects to isolate dependencies.
cd ~/example.com
virtualenv -p /home/username/opt/python-3.10.13/bin/python3 venv
source venv/bin/activate
Install Django and Dependencies
Finally, install Django and any necessary dependencies like mysqlclient for your projects.
pip3 install Django
pip3 install mysqlclient
Create the Project
Start a new Django project within the virtual environment.
cd ~/example.com
source ~/example.com/venv/bin/activate
python3 venv/bin/django-admin startproject projectname
Configure Passenger WSGI
Create a passenger_wsgi.py file in the top-level site directory with the following content to set up Passenger WSGI.
import sys, os
INTERP = "/home/username/example.com/venv/bin/python3"
if sys.executable != INTERP: os.execl(INTERP, INTERP, *sys.argv)

cwd = os.getcwd()
sys.path.append(cwd)
sys.path.append(cwd + '/projectname') #You must add your project here

sys.path.insert(0,cwd+'/venv/bin')
sys.path.insert(0,cwd+'/venv/lib/python3.10/site-packages')

os.environ['DJANGO_SETTINGS_MODULE'] = "projectname.settings"
from django.core.wsgi import get_wsgi_application
application = get_wsgi_application()
Edit Project Settings
Modify the Django project’s settings.py file to include necessary configurations.
ALLOWED_HOSTS = ['example.com' , 'www.example.com', 'localhost', '127.0.0.1']

DATABASES = {
    'default': {
        'ENGINE': 'django.db.backends.mysql',
        'NAME': 'mydatabase',
        'USER': 'mydatabaseuser',
        'PASSWORD': 'mypassword',
        'HOST': 'mysql.example.com',
        'PORT': '3306',
    }
}

STATIC_ROOT = '/home/username/example.com/public/static/'
Setup Static Files
Prepare the static files directory and collect all static files from your Django project.
cd ~/example.com/public
mkdir static
cd ~/example.com/projectname/
python3 manage.py collectstatic
Initialize Database
Run migrate to set up the database schema for your Django project.
python3 manage.py migrate
Create a Superuser
Create an administrative user for your Django project’s admin panel.
python3 manage.py createsuperuser
Notify Passenger on Changes
After any configuration change, notify Passenger by creating a restart.txt file in the /tmp directory.
mkdir tmp
touch tmp/restart.txt

Pachinko
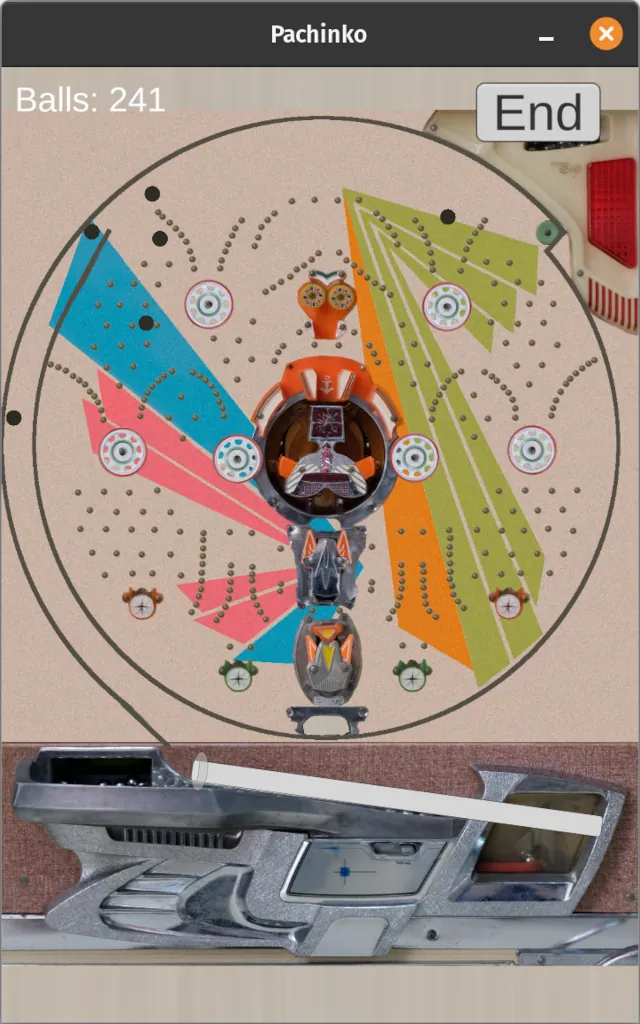
This is a digital re-creation of the popular Japanese mechanical game Pachinko. Built using Unity, this game aims to deliver an engaging and entertaining experience for both die-hard Pachinko fans and new players alike.
Pachinko
This is a digital re-creation of the popular Japanese mechanical game Pachinko. Built using Unity, this game aims to deliver an engaging and entertaining experience for both die-hard Pachinko fans and new players alike.

Send Martin Tower to Mars!
Launch the iconic skyscraper to space, and land safely on Mars
Welcome to the Send Martin Tower to Mars!, an 8-bit style adventure game where you get to launch the iconic Martin Tower into space and guide it to a safe landing on the red planet. With retro graphics and challenging gameplay, this game will put your skills to the test as you navigate through space and dodge obstacles on your way to Mars. Get ready to embark on a mission like no other, and show the universe what Martin Tower is made of!